This 3-Banana Banana Bread recipe yields a super moist, delicious, and incredibly easy-to-make loaf. It’s the perfect solution for using up those overripe bananas languishing on your counter, and it’s absolutely packed with sweet, natural banana flavor. If you’re searching for a classic, comforting banana bread recipe – the kind that tastes just like Grandma used to make – then you’re going to adore this one!
When I say this is a classic banana bread recipe, reminiscent of what your grandma might have baked, I truly mean it. In fact, this is my grandmother’s very own banana bread recipe. It’s tried, true, and has been lovingly passed down through three generations of our family. While I’m admittedly biased, I genuinely believe this is the best banana bread recipe out there. So, from our family to yours, please take a moment to read through my tips and tricks for baking the perfect loaf, and then, most importantly, enjoy!
Essential Ingredients for Perfect Banana Bread
Here’s what you’ll need to gather to make this delightful 3-banana banana bread:
- Ripe Bananas: You’ll need three. The riper, the better! Look for bananas that are heavily speckled with brown spots or even mostly brown – those ‘forgotten’ ones are perfect. Mash them easily with a fork or a potato masher in a small bowl.
- Flour: Standard all-purpose flour is what we use for this easy banana bread, ensuring a wonderfully soft crumb.
- Leavening Agents: A combination of baking powder and baking soda gives this quick bread its beautiful lift. Always check their expiration dates to ensure your banana bread rises properly.
- Salt: A crucial ingredient that enhances and balances all the other flavors in the bread. Don’t skip it!
- Sugar: Granulated white sugar provides the sweetness. While the recipe calls for a specific amount, feel free to reduce it slightly (e.g., to ¾ cup) if you prefer a less sweet loaf; it will still be delicious.
- Butter: Unsalted butter is preferred to control the saltiness. While bananas contribute a lot of moisture, butter adds richness and helps create a tender crumb that stays moist for days. Melted butter is used here. While I haven’t tested it in this specific recipe, you could likely substitute it with an equal amount of neutral-flavored vegetable oil or melted coconut oil. Avoid olive oil, as its distinct flavor can overpower the banana.
- Eggs: Large eggs are essential for binding the batter and providing structure. For best results (as with most baking), use room-temperature eggs. They incorporate more easily into the batter, leading to a more uniform texture and better volume in your finished bread.
- Vanilla Extract: A splash of pure vanilla extract enhances the other flavors and contributes a wonderful, mouth-watering aroma.
- Buttermilk: This adds a delightful, subtle tang to the banana bread. Its acidity also tenderizes the gluten, resulting in an even softer texture and more body. Furthermore, buttermilk helps activate the baking soda, which needs an acidic component to work its leavening magic.
Optional Banana Bread Add-Ins: Elevate Your Loaf!
While this wonderfully simple 3-banana banana bread recipe is absolutely delicious on its own, why not get creative? Here are some popular optional add-ins that can introduce exciting new dimensions of flavor and texture to your bake:
- Chocolate Chips: Without a doubt, chocolate chip banana bread is the most frequently requested version in our household! Stir in ½ to 1 cup of your favorite chocolate chips (semi-sweet, milk, or dark all work well), depending on how intensely chocolatey you prefer your banana bread.
- Nuts: Chopped walnuts or pecans are classic additions for a delightful banana nut bread, lending a wonderful crunch and nutty flavor. Incorporate up to one cup into the batter. Toasted nuts will offer an even deeper flavor.
- Cinnamon: A touch of ground cinnamon (about ½ teaspoon) will impart a lovely warmth and depth of flavor that complements the banana beautifully.
- Nutmeg: For a subtly nutty, earthy, and aromatic note, consider adding ¼ teaspoon of ground nutmeg. It adds a traditional “baked goods” fragrance.
How to Make This 3-Banana Banana Bread: Step-by-Step
- Preheat & Prep: First, preheat your oven to 350°F (175°C). Thoroughly grease and flour a standard 9×5-inch loaf pan. Alternatively, you can line the pan with parchment paper, leaving an overhang on two sides for easy removal later. Set the prepared pan aside.
- Combine Dry Ingredients: In a medium-sized bowl, whisk or sift together the all-purpose flour, baking soda, baking powder, and salt. This helps to distribute the leavening agents evenly and aerate the flour. Set this dry mixture aside.
- Combine Wet Ingredients & Mix Batter: In a separate large mixing bowl, using a handheld electric mixer or a sturdy fork, cream together the softened butter and sugar until the mixture is light and fluffy. Beat in the eggs one at a time, ensuring each is well incorporated before adding the next. Then, stir in the mashed bananas, buttermilk, and vanilla extract until everything is well combined.
Gradually add the dry ingredient mixture to the wet ingredients. Mix on low speed (if using an electric mixer) or by hand with a spatula until just combined. Be careful not to overmix; a few lumps in the batter are perfectly fine and actually preferred for a tender quick bread. Overmixing can lead to a tough loaf. - Bake the Bread: Pour the batter evenly into your prepared loaf pan, spreading it gently to the corners. Bake in the preheated oven for 50-60 minutes. The baking time can vary slightly depending on your oven. Start checking for doneness around the 50-minute mark. The bread is ready when a wooden skewer or toothpick inserted into the center of the loaf comes out clean, or with a few moist crumbs attached (but no wet batter).
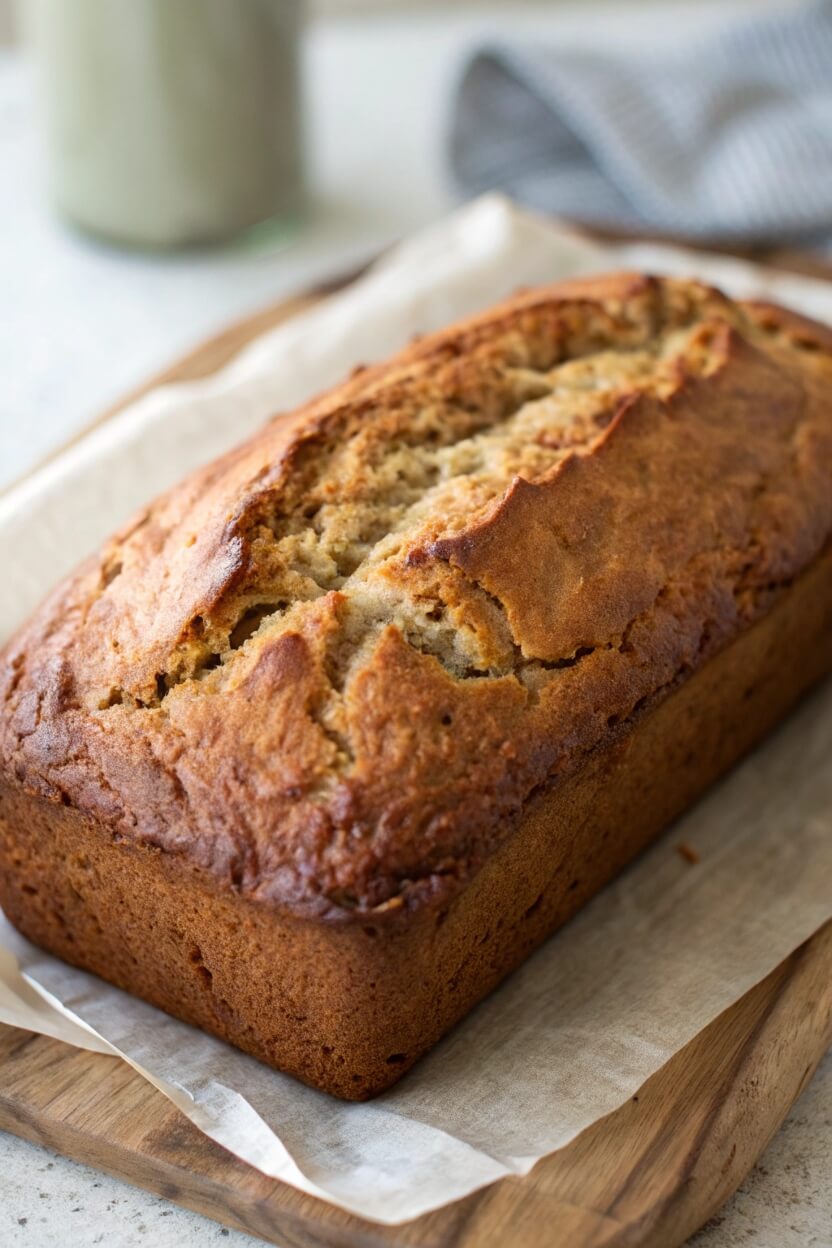
A Note on Color: This bread will develop a beautiful, deep golden brown crust. Don’t be alarmed if it looks quite dark; trust the baking time and the toothpick test to ensure it’s cooked through. - Cool, Slice, and Serve: Once baked, remove the loaf pan from the oven and let the banana bread cool in the pan on a wire rack for about 10-15 minutes. This allows it to set slightly. Then, carefully run a thin knife or spatula around the edges of the pan to loosen the loaf (if you didn’t use parchment paper). Invert the banana bread onto the wire rack to cool completely before slicing. Waiting until it’s fully cool will make for neater slices. Slice and serve as desired. Enjoy!
Tips & Tricks for Achieving the Perfect Banana Bread Loaf
- Embrace Overripe Bananas: The cornerstone of delicious, moist banana bread is the use of very ripe bananas. You’re looking for bananas that are heavily speckled with brown spots, or even mostly brown. As bananas ripen, their starches convert into sugars, making them significantly sweeter and also softer – perfect for mashing and incorporating into the batter, and lending a more intense banana flavor.
- Mash Bananas Thoroughly: When mashing your bananas, aim for a relatively smooth consistency. While a few tiny lumps are perfectly acceptable and can add character, try to avoid leaving any large, unmashed pieces. Biting into an unexpected, large, mushy chunk of banana can be an unpleasant textural surprise in an otherwise delightful bread.
- Ensure Fresh Leavening Agents: Both baking powder and baking soda are crucial for giving your bread its lift, but they can lose their potency over time, especially once opened and exposed to air and moisture. Using stale leaveners will significantly impact your bread’s ability to rise, often resulting in a flat, dense loaf.
- Testing Baking Powder: To check if your baking powder is still active, add about ½ teaspoon to a small bowl containing a few tablespoons of hot water. If it’s fresh, you should see an immediate and vigorous bubbling or fizzing reaction.
- Testing Baking Soda: You can test your baking soda by sprinkling about ½ teaspoon into a small bowl with a few tablespoons of vinegar (white or apple cider vinegar works well). If the baking soda bubbles up enthusiastically, it’s still good to use.
- Don’t Overmix the Batter: This is a critical rule for most quick breads. Once you combine the wet and dry ingredients, mix only until they are just incorporated. A few lumps in the batter are perfectly fine and actually desirable. Overmixing develops the gluten in the flour, which can lead to a tough, dense, or chewy loaf rather than a tender one.
- Consider Your Loaf Pan: If possible, use a light-colored metal loaf pan. Dark-colored pans absorb and conduct heat more intensely, which can sometimes cause the edges and bottom of your banana bread to over-brown or even burn before the center is fully cooked.
- Bake to a Deep Golden Brown (and Trust the Process): This bread develops a beautiful, rich, deep golden brown crust. While you can start checking for doneness around the 45-minute mark, in many ovens (including mine for this recipe), it often isn’t fully baked until closer to the 55-60 minute marker. At that point, the bread will be quite dark. Rely on the toothpick test (it should come out clean or with a few moist crumbs attached). If you notice the top is browning too quickly before the inside is cooked, you can loosely tent the loaf pan with aluminum foil for the remaining baking time.
Storage & Freezing Your Banana Bread
This banana bread is so delicious, it rarely lasts more than a couple of days in our house! However, if you have more self-control than my family and I, here’s how to store it:
- Room Temperature: Properly stored in an airtight container, banana bread will stay fresh on the counter for up to 4 days.
- Refrigerator: For slightly longer keeping, you can store it in an airtight container in the fridge for up to a week.
- Freezing for Later: Banana bread freezes beautifully!
- Whole Loaf: Allow the loaf to cool completely. Wrap it tightly in plastic wrap, then in aluminum foil, or place it in a large zip-top freezer bag or an airtight freezer-safe container. It can be frozen for up to 3-4 months.
- Individual Slices: For ultimate convenience, once the loaf has cooled completely, slice it. Wrap individual slices in plastic wrap, then place them into a freezer bag. This way, you can easily grab a slice or two whenever the craving strikes.
- Thawing: Thaw frozen banana bread (whether a whole loaf or slices) in the refrigerator overnight or on the counter for a few hours. Individual slices can also be gently warmed in the microwave for a few seconds or lightly toasted for a fresh-from-the-oven experience.
Banana Bread 3 Bananas
Ingredients
Method
- Preheat and Prepare: Preheat your oven to 350°F (175°C). Thoroughly grease and flour a 9×5-inch loaf pan. Alternatively, line the pan with parchment paper, leaving an overhang on the two longer sides to easily lift the bread out later. Set aside.
- Combine Dry Ingredients: In a medium-sized bowl, whisk or sift together the all-purpose flour, baking powder, baking soda, and salt. This helps to distribute the leavening agents evenly and aerate the flour. Set this dry mixture aside.
- Cream Butter and Sugar, then Add Wet Ingredients: In a large mixing bowl, using a handheld electric mixer or a stand mixer fitted with the paddle attachment (or even a sturdy whisk and some elbow grease!), cream together the softened butter and granulated sugar until the mixture is light in color and fluffy. This usually takes 2-3 minutes.
- Beat in the room-temperature eggs one at a time, mixing well after each addition until fully incorporated. Scrape down the sides of the bowl as needed. Stir in the vanilla extract.
- Next, gently stir in the mashed bananas and the buttermilk until just combined.
- Combine Wet and Dry Ingredients: Gradually add the dry ingredient mixture to the wet ingredient mixture. Mix on low speed or by hand with a spatula until just combined. Be very careful not to overmix at this stage; a few small lumps in the batter are perfectly fine. If using, gently fold in your optional add-ins (chocolate chips, nuts, etc.) now.
- Bake the Banana Bread: Pour the batter evenly into your prepared loaf pan, spreading it gently to the corners.
- Bake in the preheated oven for 50-60 minutes, or until a wooden skewer or toothpick inserted into the center of the loaf comes out clean, or with a few moist crumbs attached (but no wet batter). Baking times can vary slightly depending on your oven.
- Cool and Serve: Once baked, remove the loaf pan from the oven and place it on a wire cooling rack. Let the banana bread cool in the pan for 10-15 minutes. This allows it to set slightly and makes it easier to remove.
- After 10-15 minutes, carefully run a thin knife or spatula around the edges of the pan (if not using parchment overhang) and then invert the banana bread onto the wire rack to cool completely. For the neatest slices, it's best to wait until the bread is fully cool before slicing.
- Serve warm or at room temperature. It's delicious on its own, or with a spread of butter, Nutella, or peanut butter. Enjoy!
Notes
- Ripe Bananas are Key: For the best flavor and natural sweetness, use very ripe bananas (the ones with lots of brown spots). If your bananas aren't ripe enough, you can often speed up the process.
- Fresh Leaveners: Ensure your baking soda and baking powder are fresh and not expired. Old leavening agents can result in a dense, flat loaf.
- Don't Overmix: This is crucial for tender banana bread. Mix the wet and dry ingredients only until they are just combined. A slightly lumpy batter is better than an overmixed one. You don't want visible pockets of dry flour, but the batter doesn't need to be perfectly smooth.
- Room Temperature Ingredients: Using room temperature butter, eggs, and buttermilk helps them incorporate more easily and evenly into the batter, leading to a better texture.