This Chocolate Chip Banana Bread is a true delight – wonderfully moist and bursting with the sweetness of ripe bananas and delightful pockets of melty chocolate chips. It boasts an abundance of banana flavor, making it a truly satisfying treat.
My Go-To Chocolate Chip Banana Bread Recipe
I simply can’t bear to let my overripe bananas go to waste! I often buy large quantities of bananas, fully aware that some will inevitably ripen past their prime, perfect for whipping up my classic Banana Bread and Banana Muffins. However, when my family’s chocolate cravings kick in, this Chocolate Banana Bread is our absolute go-to. It’s an undeniable favorite with my children, and honestly, we’re quite smitten with it too. And did I mention how incredibly EASY it is? It literally comes together in a single bowl!
Essential Ingredients for Perfect Chocolate Chip Banana Bread
As with virtually any successful baking endeavor, the most crucial tip I can offer for this Chocolate Chip Banana Bread is to ensure that your key perishable ingredients – namely, eggs, butter, and especially the bananas – are all at room temperature. This seemingly small detail plays a significant role in achieving the ideal texture and consistency in your final product.
- Bananas – The Riper, The Better! This is perhaps the most critical ingredient for truly exceptional banana bread. Don’t shy away from those deep yellow bananas with abundant brown spots, or even those that are almost entirely brown. The riper the bananas, the more natural sweetness they impart, and critically, the more moisture they contribute to the bread, resulting in that wonderfully tender, melt-in-your-mouth crumb. If you’ve been a savvy planner and stored your overripe bananas in the freezer for future use, remember to thaw them properly. You can either let them sit at room temperature for 1-2 hours or, for a more gradual approach, thaw them overnight in the refrigerator. Once thawed, it’s essential to drain any excess liquid that may have accumulated; this prevents your batter from becoming too thin.
- Chocolate Chips – Your Sweet Canvas: My personal preference for this recipe leans towards semi-sweet chocolate chips. Their balanced sweetness complements the rich banana flavor without overwhelming it. However, the beauty of this ingredient lies in its versatility! Feel free to experiment with milk chocolate chips for a sweeter, creamier profile, or even dark chocolate chips for a more intense, sophisticated cocoa note. You could also consider a mix of different chocolate chip types for added depth of flavor.
- Eggs – The Binding Element: Always use large eggs for this recipe. Eggs act as a crucial binder, providing structure and richness to the bread. If you’ve forgotten to take your eggs out of the refrigerator in advance, don’t fret! A quick trick to bring them to room temperature is to place them in a bowl of warm (not hot!) water for about 5 minutes. This gentle warming helps them incorporate more smoothly into the batter, leading to a more uniform texture.
- Butter – For Richness and Tenderness: Unsalted butter is the preferred choice here, as it allows you to control the overall salt content of your bread. Room temperature butter is paramount for proper creaming with the sugar, which in turn incorporates air into the batter, contributing to a lighter, more tender crumb. If you find yourself in a pinch and your butter is still cold and hard, there are quick methods to soften it without melting.
- Pantry Staples – The Foundation: Beyond the star ingredients, you’ll need the fundamental pantry staples that form the backbone of most baked goods: high-quality all-purpose flour for structure, granulated sugar for sweetness and moisture, baking soda as a leavening agent to help the bread rise beautifully, and a pinch of salt to balance the flavors and enhance the sweetness. Ensuring these staples are fresh and properly measured will guarantee consistent, delicious results every time.
Embrace Those Overripe Bananas!
For truly exceptional banana bread, the secret lies in using very ripe, even mushy, bananas. You can easily identify them by the color of their peel – it should be significantly browned or almost entirely brown. When gently squeezed between your fingertips, a perfectly ripe banana will feel soft and yield easily, making it effortless to mash with a fork. Aim to mash your bananas until they reach a chunky applesauce consistency. Don’t worry about getting them perfectly smooth; a bit of texture from the banana pieces actually adds a wonderful element to the finished bread!
Choosing the Best Chocolate Chips for Your Baking
For this particular recipe, we opted for semi-sweet chocolate chips. We found their balanced sweetness perfectly complements the natural sweetness already provided by the overripe bananas and the added sugar in the recipe. However, the choice of chocolate chips is truly a matter of personal preference! If you prefer a sweeter bite, feel free to use milk chocolate chips. Conversely, if you’re looking to cut down on the overall sweetness and prefer a richer, more intense chocolate flavor, bittersweet chocolate chips would be an excellent choice.
While we used standard-sized baking chips, mini chocolate chips would also work beautifully, distributing smaller pockets of chocolate throughout the bread. Depending on how sweet you like your bread, you can use anywhere from 2/3 to 3/4 cup of mini chocolate chips.
Crafting Your Perfect Chocolate Chip Banana Bread: A Step-by-Step Guide
One of the many joys of making Chocolate Chip Banana Bread is its adaptability when it comes to mixing methods. Whether you have the convenience of a stand mixer, the versatility of an electric hand mixer, or simply your own two hands and a whisk, this recipe can be successfully brought together. While a stand or hand mixer will certainly make the process quicker and less strenuous, a little extra effort with a whisk will yield equally delicious results.
- Preparation is Key (Prep): Begin by preheating your oven to 350˚F (175˚C). This ensures the oven is at the correct temperature when your batter is ready, promoting an even bake. Next, prepare your standard bread loaf pan (typically 9×5 inches) by generously buttering and lightly flouring it. This creates a non-stick surface, ensuring your beautiful banana bread slides out easily after baking. Alternatively, you can line the pan with parchment paper, leaving an overhang on the sides to create “handles” for easy removal.
- Creaming the Foundation: In a large mixing bowl (the one you’ll be using for your main batter), combine your softened, room-temperature unsalted butter with the granulated sugar. Using your stand mixer fitted with the paddle attachment, an electric hand mixer, or a sturdy whisk, cream these two ingredients together until the mixture is light, fluffy, and pale in color. This process incorporates air, which is crucial for a tender crumb. Once creamed, add your two lightly beaten, room-temperature large eggs, mixing until just combined. Avoid overmixing at this stage.
- Introducing the Banana Goodness: Now, it’s time for the star of the show – the mashed bananas. As discussed, these should be wonderfully overripe and easily mashable. Add them directly to your mixing bowl with the butter, sugar, and egg mixture. Gently fold or mix them in. Remember, the goal is to have them mashed to a chunky applesauce consistency; some small lumps of banana are not only acceptable but desirable, as they add wonderful pockets of flavor and texture to the finished bread.
- Combining Dry and Wet Ingredients: In a separate, medium-sized bowl, whisk together your dry ingredients: the all-purpose flour, baking soda, and salt. Whisking them separately ensures that the leavening agent (baking soda) and salt are evenly distributed throughout the flour, preventing pockets of unmixed ingredients in your final product. Once thoroughly combined, gradually add this flour mixture to your wet batter in the main mixing bowl. Mix on low speed (if using a mixer) or fold gently by hand until just combined. The key here is to avoid overmixing, as overdeveloped gluten can lead to a tough bread. A few streaks of flour are perfectly fine; they will disappear during baking.
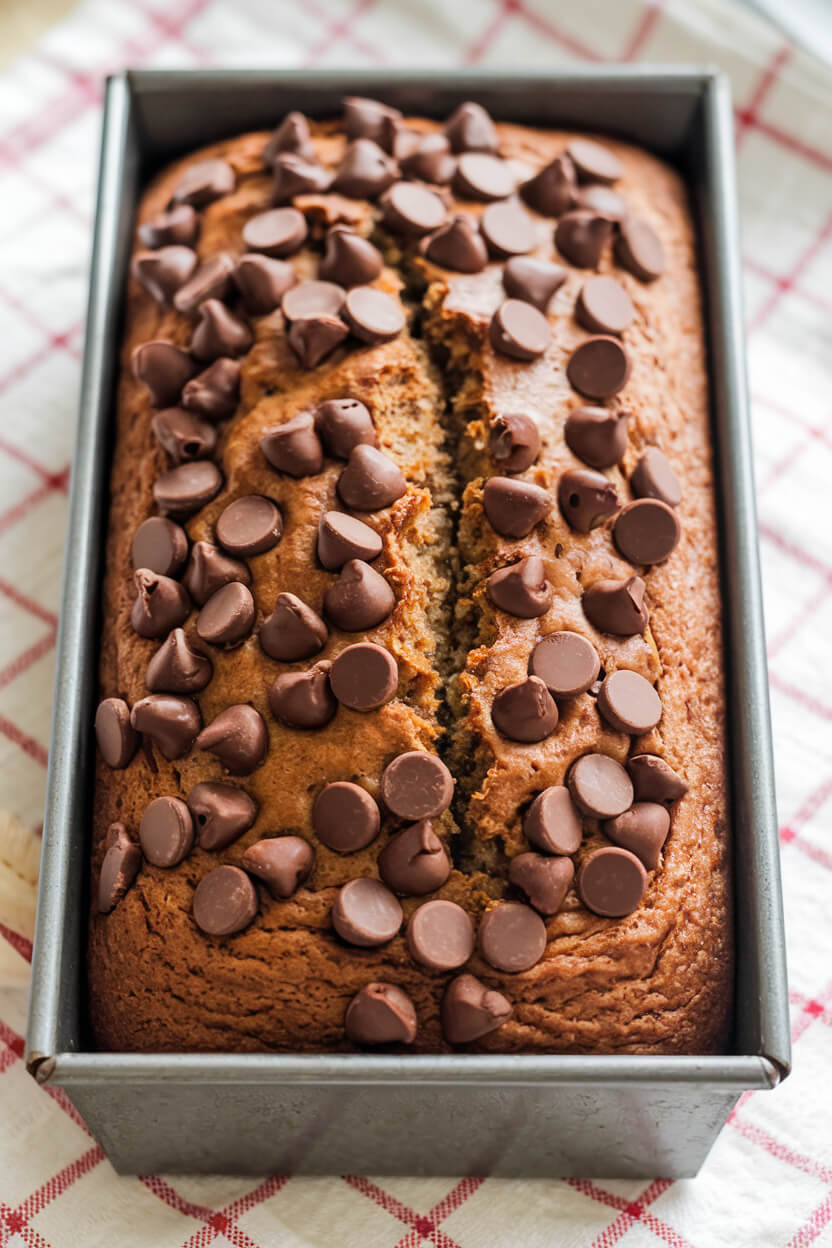
- The Chocolate Chip Finale & Baking: With the batter almost complete, it’s time for the chocolate chips! Fold in about 3/4 of your chosen chocolate chips (whether semi-sweet, milk, or bittersweet). Reserve the remaining 1/4 cup for scattering over the top – this creates a beautiful visual appeal and ensures melty chocolate on the crust. Once the chocolate chips are evenly distributed, transfer the thick, slightly lumpy batter into your prepared bread loaf pan, spreading it evenly with a spatula. Finally, sprinkle the reserved chocolate chips over the surface of the batter. Place the pan in your preheated oven and bake for approximately 55-65 minutes, or until a wooden skewer or toothpick inserted into the center comes out clean or with only a few moist crumbs attached.
You’ll know you’ve achieved the perfect consistency when your chocolate chip banana bread batter is wonderfully thick and boasts those delightful small lumps of mashed banana. This texture is a tell-tale sign of a moist, flavorful, and perfectly balanced loaf to come!
Storing Your Delicious Chocolate Chip Banana Bread
One of the truly marvelous aspects of this Chocolate Chip Banana Bread is how the chocolate chips miraculously remain wonderfully gooey and moist, even long after the loaf has emerged from the oven and cooled. This delightful quality ensures that your banana bread stays fresh and enjoyable for several days, making it perfect for meal prep or simply savoring over time.
- Room Temperature Storage: For optimal texture and flavor, once your banana bread has completely cooled to room temperature (this is crucial to prevent condensation and sogginess), wrap it tightly in plastic wrap or place it in an airtight container. Stored this way, it will remain fresh and delicious at room temperature for up to 2 days. The tight seal helps to lock in its inherent moisture.
- Refrigeration (Use with Caution): While it’s generally advisable to avoid refrigerating banana bread, as the cool, dry air of the refrigerator can sometimes cause it to dry out and become less tender, it is an option if you need to extend its shelf life. If you choose to refrigerate, ensure it’s well-wrapped or in an airtight container. It will keep for 3-5 days in the refrigerator. Just be aware that the texture might be slightly firmer.
- Freezing for Longer Enjoyment: For long-term storage, freezing is an excellent solution. Once the bread is completely cool, you have a couple of options:
- Whole Loaf: Wrap the entire loaf tightly in a layer of plastic wrap, followed by a layer of aluminum foil, or place it in a freezer-safe zip-top bag, pressing out as much air as possible.
- Individual Slices: For convenience, you can slice the bread first, then wrap individual slices in plastic wrap before placing them in a freezer-safe bag or container. This allows you to thaw only what you need.
Frozen banana bread will maintain its quality for up to 3 months. When you’re ready to enjoy it, simply thaw it at room temperature for a few hours. You can even gently warm individual slices in a microwave or toaster oven for that freshly baked feel.
It’s undeniably challenging to wait for this Chocolate Chip Banana Bread to cool completely; the anticipation is almost unbearable! I often find myself cutting into it when it’s just barely no longer hot to the touch. The cozy, comforting aroma that lingers in my kitchen after baking is truly incredible – it fills the house with a warmth that reminds me of Christmas morning, creating an inviting and joyful atmosphere.
Chocolate Chip Banana Bread
Ingredients
Method
- Prepare Oven & Pan: Preheat your oven to 350˚F (175˚C). Generously butter and lightly flour a standard bread loaf pan (e.g., 9.25"L x 5.25"W x 2.75"D). This ensures easy release after baking.
- Cream Wet Ingredients: In a large mixing bowl, using a stand mixer with a paddle attachment or an electric hand mixer, cream together the softened butter (0.4 cup / 8 Tbsp) and granulated sugar (0.53 cup) until light and fluffy. Beat in the lightly whisked eggs (1.6 large eggs) until just combined.
- Add Bananas & Vanilla: Mash the very ripe bananas (2.4 medium/large) with a fork until they reach a chunky applesauce consistency; some small lumps are desirable. Add the mashed bananas and vanilla extract (0.4 tsp) to the wet mixture in the bowl. Mix gently until just blended.
- Combine Dry Ingredients: In a separate medium bowl, whisk together the all-purpose flour (1.2 cups), baking soda (0.8 tsp), and salt (0.4 tsp) until well combined.
- Mix & Bake: Gradually add the dry ingredient mixture to the wet batter. Mix on low speed or fold by hand until just incorporated, being careful not to overmix. Gently fold in 3/4 of the chocolate chips (from your 0.8 cup total). Transfer the batter evenly into your prepared loaf pan. Sprinkle the remaining 1/4 of the chocolate chips over the top. Bake for 55-65 minutes, or until a wooden skewer or toothpick inserted into the center comes out clean.
- Cooling: Let the banana bread rest in the pan for 10 minutes before carefully transferring it to a wire rack to cool completely.
Notes
- Room Temperature Storage: Once the banana bread has completely cooled, wrap it tightly in plastic wrap or place it in an airtight container. It will stay wonderfully fresh and moist at room temperature for up to 2 days.
- Refrigeration (Use with Caution): While not ideal, as refrigeration can sometimes dry out banana bread, you can store it in the refrigerator for 3-5 days if needed. Ensure it's well-wrapped in plastic or an airtight container to minimize moisture loss.
- Freezing for Longer Enjoyment: For extended freshness, freezing is an excellent option. Wrap the cooled loaf (or individual slices) tightly in a layer of plastic wrap, followed by aluminum foil, or place in a freezer-safe bag. It can be frozen for up to 3 months. To enjoy, simply thaw at room temperature for about 3 hours.