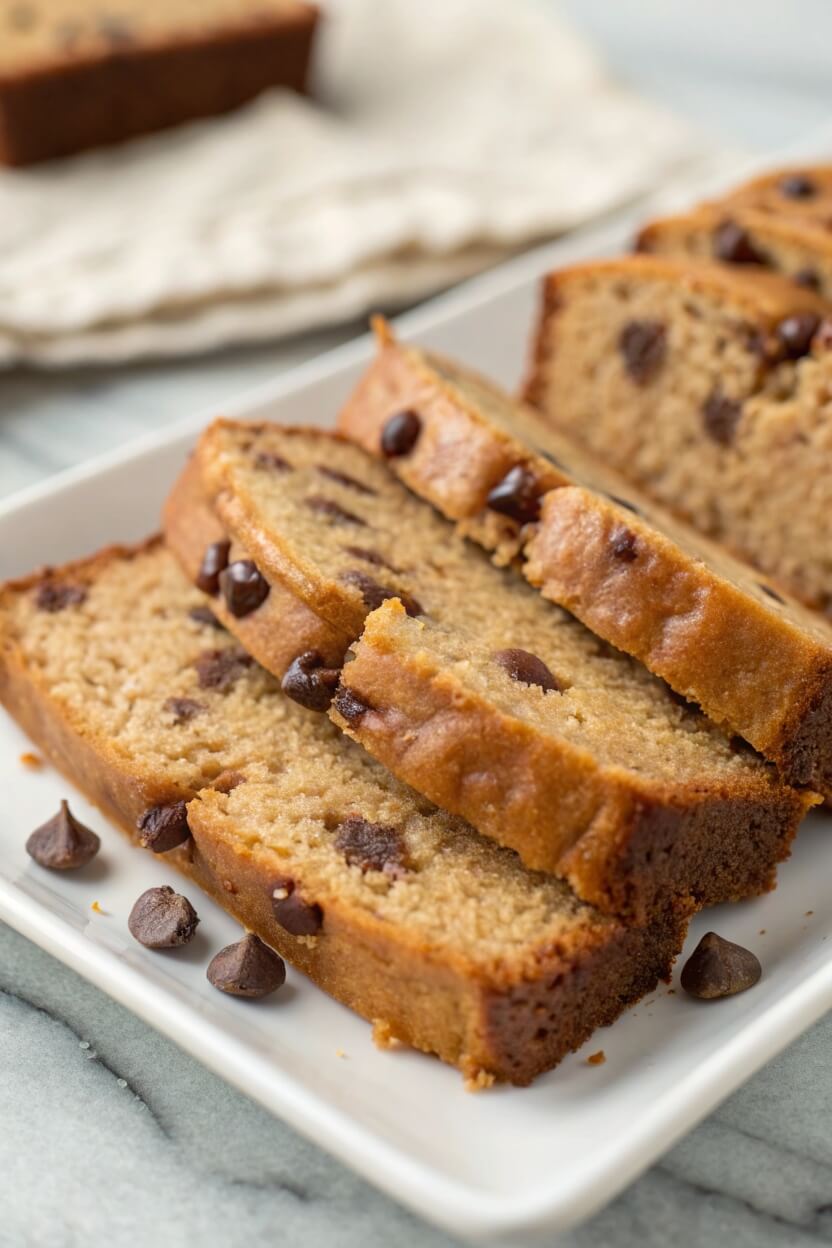
Are you ready for a banana bread recipe that will absolutely blow your mind? Say goodbye to complicated steps and hello to this Easy One-Bowl Peanut Butter Banana Bread. It’s incredibly soft, wonderfully fluffy, and bursting with a crazy delicious flavor combination that proves banana bread and peanut butter are a match made in heaven. Seriously, PB + Banana = the best combo ever!
Let’s be honest, sometimes life (or even just a dreary January day) calls for some serious comfort food. If you’re feeling those vibes, or simply craving a treat that’s both easy to make and incredibly satisfying, you’ve come to the right place. This isn’t just any banana bread; it’s a peanut butter banana bread that will have you reaching for a second slice before the first is even finished. Prepare to be amazed!
Why You’ll Fall in Love with This Peanut Butter Banana Bread Recipe:
- Insanely Delicious: The rich, nutty peanut butter perfectly complements the sweet, fruity banana.
- Unbelievably Soft & Fluffy Texture: This bread is tender, moist, and has a velvety crumb.
- One-Bowl Wonder: Minimal cleanup? Yes, please! All ingredients come together in a single bowl.
- Quick & Easy: Perfect for beginner bakers or when you need a delicious treat without the fuss.
- Crowd-Pleaser: Guaranteed to be a hit with family and friends.
What Magic Does Peanut Butter Bring to Banana Bread?
You might be wondering, “What does peanut butter actually do for banana bread?” I’m so glad you asked, because it’s a game-changer!
- Intense, Rich Flavor: Peanut butter doesn’t just add a hint of nuttiness; it infuses the entire loaf with a deep, savory, and unmistakably rich peanut butter flavor that beautifully balances the sweetness of the bananas.
- Ultra-Soft & Moist Texture: The healthy fats in peanut butter contribute to an incredibly tender and moist crumb. We’re talking unbelievably soft, almost velvety, making each bite a luxurious experience. The texture truly is amazing.
How to Make This Easy One-Bowl Peanut Butter Banana Bread
The beauty of this recipe lies in its simplicity. Like any good quick bread, all the ingredients are combined in one bowl. The key is not to overmix. Gently stir the wet and dry ingredients together until just combined – those little dusty streaks of flour should barely disappear. Overmixing can lead to a tough bread, and we’re aiming for soft and fluffy perfection here!
The Great Chocolate Chip Debate: To Add or Not to Add?
Ah, the age-old question when it comes to banana bread enhancements: chocolate chips, yay or nay?
In this peanut butter banana bread, chocolate chips are entirely appropriate and, of course, completely optional. The bread is phenomenally delicious either way.
Here’s my little disclaimer: While I’m a firm believer that chocolate chips make almost everything better, it’s worth noting that they do tend to take center stage in the flavor profile. When you add chocolate chips, the pure, distinct peanut butter flavor becomes a bit more of a supporting actor rather than the star.
So, what’s a baker to do?
- For the Strongest Peanut Butter Flavor: If you want that glorious, unadulterated peanut butter taste to shine through in all its glory, I recommend leaving out the chocolate chips.
- For a Delicious PB & Chocolate Combo: If you’re perfectly happy with a bit of flavor-sharing and adore the classic peanut butter and chocolate pairing (who doesn’t?), then by all means, throw them in! Milk chocolate, semi-sweet, or dark chocolate chips all work wonderfully.
A Wild (and Highly Recommended) Idea: Now, I don’t want to encourage anyone to stray too far from their culinary comfort zones, but since we can all agree that banana bread isn’t exactly a health food, perhaps someone should explore the revolutionary idea of ditching the chocolate chips and adding in mini or chopped peanut butter cups instead. Whoa. Mind blown, right? That someone should probably be me. And it should probably be today. Imagine: peanut butter banana bread, studded with more peanut butter and chocolate!
Baking Success: Choosing the Right Loaf Pan & Adjusting for Size
One of the most common frustrations when baking banana bread or any quick bread is achieving that perfect, even bake. We’ve all been there: the dreaded over-browned crust with a stubbornly gooey center, or a loaf that sinks sadly in the middle. Let’s troubleshoot!
Why Your Quick Bread Might Not Be Baking Perfectly
- Oven Temperature Accuracy: Every oven is a little different. What reads 350°F (175°C) on your dial might be slightly higher or lower in reality. An oven thermometer is a baker’s best friend!
- Elevation: Baking at high altitudes often requires recipe adjustments due to lower air pressure.
- Opening the Oven Door: Resist the urge to peek too often! Each time you open the door, the oven temperature drops, which can affect rising and even baking.
- Pan Type & Material: This is a big one! The type of loaf pan you use significantly impacts how your bread bakes.
The Impact of Loaf Pan Material on Your Banana Bread
In my extensive baking experience, I’ve found that pan material is a foremost factor for quick bread success.
- Dark-Coated Metal Pans & Glass Loaf Pans: These materials tend to absorb and retain heat more intensely. This can cause the outside of your banana bread to bake (and even over-brown) much faster than the inside, leaving you with a gooey, underdone center.
- Light-Colored Nonstick Metal Loaf Pans: These are generally my top recommendation. They distribute heat more evenly, promoting a consistent bake from edge to center. This results in a beautifully golden crust and a perfectly cooked interior.
What if you only have a dark-coated or glass pan?
- Reduce Oven Temperature: Try lowering your oven temperature by 25°F (approximately 15°C).
- Check for Doneness Earlier: Start checking your bread 10-15 minutes before the recipe’s suggested bake time.
- Tent with Foil: If you notice the top browning too quickly but the center isn’t done, loosely tent the loaf pan with aluminum foil for the remainder of the baking time.
- Consider an Upgrade: If you bake quick breads frequently, adding a couple of high-quality, light-colored nonstick loaf pans (like a standard 9×5 inch or 8.5×4.5 inch) to your kitchen arsenal is a worthwhile investment.
Adjusting for Loaf Size: This Peanut Butter Banana Bread Makes a Generous Loaf!
This particular peanut butter banana bread recipe yields a very substantial, satisfying loaf. My kids can devour an entire loaf practically as soon as they walk in from school – it’s just that good, and we’ve been making it nonstop!
Want a Smaller Loaf or Live at High Altitude?
- Smaller Portions: If a large loaf is too much, or you’d like variety, you can easily repurpose some of the batter. Consider making:
- Peanut Butter Banana Muffins: Fill muffin cups 2/3 full and bake for approximately 18-25 minutes, or until a toothpick comes out clean.
- Mini Loaves: Divide the batter among mini loaf pans and adjust baking time accordingly (likely 25-35 minutes, but start checking early).
- High Altitude Baking: If you live at a high elevation (typically above 3,000 feet), you might find that quick breads and cakes are prone to overflowing or having structural issues. While I bake successfully with the full amount at around 2,500 feet in a 9×5-inch loaf pan, those at higher altitudes might benefit from dividing the batter as suggested above. You may also need to make other common high-altitude adjustments like slightly reducing leavening agents or increasing liquid.
Storing Your Delicious Peanut Butter Banana Bread for Lasting Freshness
Proper storage will keep your peanut butter banana bread tasting its best!
- Room Temperature: Once completely cooled, store your banana bread tightly wrapped in plastic wrap, aluminum foil, or in an airtight container at room temperature for up to 3 days.
- Refrigerator: To extend its freshness, you can store the well-wrapped bread in the refrigerator for up to 5 days. The texture might become slightly denser when chilled.
Freezing Peanut Butter Banana Bread (It Freezes Beautifully!)
Like many quick bread recipes, this peanut butter banana bread freezes exceptionally well, making it perfect for a make-ahead treat.
- Freezing a Whole Loaf:
- Ensure the loaf is completely cool.
- Wrap it securely in a layer of plastic wrap.
- Follow with a layer of heavy-duty aluminum foil or place it in a large freezer-safe zip-top bag. This double protection helps prevent freezer burn.
- Label with the date and freeze for up to 2-3 months.
- To Thaw: Let the wrapped bread thaw at room temperature for a few hours or overnight.
- Freezing Individual Slices:
- Slice the completely cooled bread.
- Wrap each slice individually in plastic wrap.
- Place the wrapped slices in a zip-top freezer bag.
- Freeze for up to 1-2 months.
- To Thaw/Reheat: Thaw individual slices at room temperature for about 30-60 minutes. For a warm treat, unwrap and microwave a slice for about 20-30 seconds, or until warmed through. You can also toast them lightly!
Peanut Butter Banana Bread
Ingredients
Equipment
Method
- Preheat & Prep Pan: Preheat your oven to 350°F (175°C). If using a dark-coated metal or glass loaf pan, reduce the oven temperature to 325°F (160°C) to prevent over-browning.
- Lightly grease a 9x5-inch loaf pan. For easiest removal, line the pan with parchment paper, allowing some overhang on the two longer sides to act as handles.
- Combine Wet Ingredients: In a large mixing bowl, add the mashed bananas, granulated sugar, packed light brown sugar, melted butter (or oil), sour cream, peanut butter, lightly beaten eggs, and vanilla extract. Whisk these ingredients together until thoroughly combined and smooth.
- Add Dry Ingredients & Mix Gently: Add the all-purpose flour, baking soda, and salt directly to the wet ingredients in the bowl.
- If using, stir in the chocolate chips. Using a spatula, gently fold everything together until just combined and no large dry streaks of flour remain. Be careful not to overmix; a few small streaks are okay. Overmixing can result in a tougher bread.
- Bake to Perfection: Pour the batter evenly into your prepared loaf pan, spreading it gently to the corners. Bake for 50-60 minutes.
- The bread is done when a wooden skewer or toothpick inserted into the center comes out clean, or with a few moist crumbs attached (it should not have wet batter).
- Cool Completely Before Slicing: Let the peanut butter banana bread cool in the pan on a wire rack for 10-15 minutes.
- Then, use the parchment paper overhangs to carefully lift the loaf out of the pan and place it directly on the wire rack to cool completely. (Patience pays off! The peanut butter flavor intensifies and the texture improves as the bread cools. It's often even more delicious the next day.) Once fully cooled, slice into 10 generous pieces and enjoy.
Notes
-
Pan Size: This recipe creates a generous, full loaf in a standard 9x5-inch loaf pan.
- Smaller Pan Option: If using an 8.5x4.5-inch pan, fill it no more than 2/3 to 3/4 full to prevent overflow. Use any leftover batter for a few muffins or a mini loaf (adjust baking times accordingly).
- Banana Ripeness: For the best, sweetest banana flavor and optimal moisture, use very ripe bananas – those with plenty of brown spots and no remaining green. They will also be easier to mash.
-
Butter vs. Oil:
- Melted Butter: Preferred for the richest flavor in this bread.
- Oil: A neutral-flavored oil (like canola, vegetable, or light olive oil) works well as a substitute.
- Applesauce: You can experiment by replacing part of the oil with unsweetened applesauce for a slightly lighter crumb, though it may subtly change the texture.
-
Peanut Butter Choice:
- Recommended: This recipe has been tested and yields the best results with creamy, processed peanut butter (such as Jif or Skippy).
- Not Recommended: Natural peanut butter (the kind that requires stirring) and crunchy peanut butter are not advised, as they can make baked goods drier.
- Alternatives: Other nut or seed butters (e.g., almond, cashew, sun butter) have not been tested in this specific recipe, so results may vary.
- Whole Wheat Flour Option: For a heartier texture, you can successfully substitute up to 50% of the all-purpose flour with white whole wheat flour. The bread will still be moist and delicious.